 how-to
How to Calibrate a Digital Blood Pressure Monitor
Table of Contents
- Why Digital Blood Pressure Monitor Calibration Matters for Clinical Accuracy
- How to Run a Blood Pressure Monitor Accuracy Test
- How Often to Calibrate a Blood Pressure Monitor
- Step-by-Step: How to Calibrate a Digital Blood Pressure Monitor
- Troubleshooting Digital BP Machine Errors
- Cuff Size, Placement, and Maintenance: What Affects Accuracy Most
- Professional Validation vs. DIY Calibration: What Home Users Can and Cannot Do
- Conclusion
- Frequently Asked Questions
Last Updated: September 27, 2026
Why Digital Blood Pressure Monitor Calibration Matters for Clinical Accuracy
Learning how to calibrate blood pressure monitor readings starts with understanding one hard truth: a home device that drifts by even a few mmHg can misclassify a patient. At E&E Medicals and Consulting Inc, we hear this concern from practice owners and procurement teams constantly, and it's justified. A blood pressure monitor accuracy test is the only way to know whether the numbers on screen match reality.
How to Run a Blood Pressure Monitor Accuracy Test
The most reliable accuracy test compares your digital device against a calibrated manual sphygmomanometer, read by two trained observers at the same time. This is the standardized testing method used in clinical validation protocols.
What counts as a passing result:
- The average difference between devices stays within 5 mmHg
- The standard deviation of those differences stays within 8 mmHg
- Readings are taken across a range of pressures, not just one
Comparing Digital Readings With a Manual Sphygmomanometer
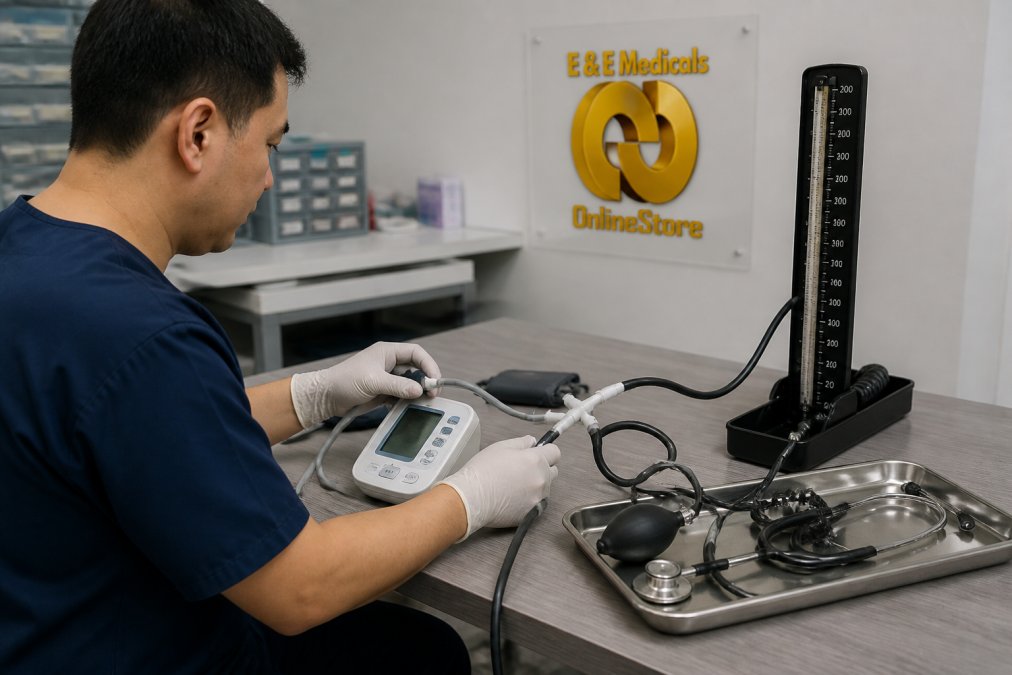
Set up both devices on the same arm. Use a T-tube connector so the cuff and the mercury manometer share one air path. This removes any difference caused by cuff placement.
Then run the test like this:
- Let the patient rest for five minutes, seated, back supported
- Wrap the cuff on the bare upper arm, level with the heart
- Inflate to about 30 mmHg above the expected systolic value
- Deflate slowly, at 2 to 3 mmHg per second
- Have one observer read the mercury column and another read the digital display
- Record both numbers for each measurement
American Heart Association guidance on blood pressure measurement
How Often to Calibrate a Blood Pressure Monitor
The common answer is every one to two years, but that's a floor, not a schedule. How often to calibrate a blood pressure monitor depends on how hard the device works and where it lives.
Test sooner if any of these apply:
- The device is used daily in a clinic or care facility
- It has been dropped, bumped, or stored in extreme temperatures
- Readings suddenly disagree with a second monitor
- The cuff or tubing has been replaced
- A patient's readings conflict with how they feel
Step-by-Step: How to Calibrate a Digital Blood Pressure Monitor
To calibrate blood pressure monitor hardware fully is a bench procedure performed with a pressure manometer and a service manual, not a home task. What a home user or clinic staff member can do is run a calibration check that either confirms the device is tracking a reference within tolerance or flags it for professional service. The two are not the same, and conflating them is the most common error in consumer guides.
What True Calibration Actually Involves
Inside every oscillometric monitor is a pressure transducer that converts cuff pressure into an electrical signal. Over time that transducer drifts, and the firmware's internal offset no longer matches reality. True calibration means:
- Pressurizing the device against a calibrated reference manometer (typically a mercury column or a digital pressure standard traceable to a national lab).
- Comparing the device's internal pressure reading to the reference at multiple set points, commonly 0, 50, 100, 150, 200, and 250 mmHg.
- Entering the device's service mode (accessed via a manufacturer-specific key sequence or service software) and adjusting the offset and gain values so the internal reading matches the reference at every set point.
- Re-running the pressure sweep to confirm the adjustment holds, then sealing the device and issuing a calibration label with the date and next-due date.
What You Will Need Before You Start
Gather these items first. Missing one will stall the check halfway through.
- A calibrated reference manometer or a recently validated digital monitor
- A T-tube or Y-connector to link both devices to one cuff
- A correct-size cuff for the patient's arm
- A stethoscope for the manual reference reading
- A log sheet for recording paired readings
- The device's user manual (for cuff-size limits and error-code meanings)
The Calibration Check Procedure
Follow these steps in order. Each one builds on the last.
- Rest the patient for five minutes in a quiet room
- Measure arm circumference and select the right cuff size
- Connect both devices to the single cuff using the T-tube
- Take three paired readings, waiting one minute between each
- Calculate the difference for each pair and average them
- Compare against the 5 mmHg threshold
- Record the result and tag the device as passed or failed
Why the Procedure Stops Here for Home Users
The check above tells you whether the device is off. It does not bring it back into tolerance. Adjusting the internal pressure sensor requires a calibrated pressure source, service-mode access, and, for most brands, a service manual that is not distributed to end users. Attempting the adjustment without those tools typically makes the drift worse, not better. If the check fails, the correct next step is a manufacturer-authorized service center, not a screwdriver.
Troubleshooting Digital BP Machine Errors
Most error codes trace back to cuff problems, movement, or a weak signal, not a broken device. Troubleshooting digital BP machine errors usually means checking the simple things first.
| Error Symptom | Likely Cause | Fix |
|---|---|---|
| "Err" or "E" code on inflation | Loose tubing or cuff | Reconnect tubing, retest |
| Wildly high readings | Cuff too small | Measure arm, resize cuff |
| Wildly low readings | Cuff too large or loose | Reposition at heart level |
| Reading fails mid-cycle | Patient moved or spoke | Retest after 2 minutes rest |
| Inconsistent repeat readings | Low battery or sensor drift | Replace batteries, then recheck |
| No reading at all | Blocked air path | Inspect tubing for kinks |
Cuff Size, Placement, and Maintenance: What Affects Accuracy Most
Cuff fit causes more bad readings than any electronic fault. Get this right and most accuracy problems disappear.
Placement rules that matter:
- Bare upper arm, no clothing under the cuff
- Cuff edge 2 to 3 cm above the elbow crease
- Cuff centered over the brachial artery
- Arm supported at heart level
Maintenance habits that protect accuracy:
- Store the device away from heat, moisture, and direct sun
- Check tubing for cracks every few months
- Replace batteries before they run low
- Keep the cuff clean and free of folds
CDC guidance on measuring blood pressure accurately
Professional Validation vs. DIY Calibration: What Home Users Can and Cannot Do
Here's the line most guides blur: you can check a monitor at home, but you cannot calibrate it. Calibration means adjusting the internal pressure sensor so its output matches a known reference. That requires a calibrated manometer, a pressure source, and the ability to enter service mode.
Validation vs. Calibration: Two Different Words
These terms get used interchangeably online, but they describe different activities:
- Validation (also called verification) answers the question "Is this device still accurate?" It is a comparison against a reference standard. A home user with a second, recently validated monitor can perform a basic validation.
- Calibration answers the question "How do I make this device accurate again?" It is an adjustment of the device's internal sensor output. It requires a traceable pressure standard and service-mode access.
What Home Users Can Do
- Run a comparison check against a validated device
- Confirm cuff size and placement are correct
- Track readings over time to spot drift
- Send a failing device for service
What Only a Professional Can Do
- Adjust the internal pressure sensor
- Run a full validation protocol across a pressure range
- Issue a calibration certificate
- Verify clinical grade performance
Smartwatch and Wearable BP Sensors
Wrist-based and wearable monitors use different sensor technology from a cuff device, and their readings cannot be validated the same way. Most consumer wearables estimate blood pressure from pulse-wave timing and optical sensors rather than from a pressure cuff, which means there is no cuff pressure to compare against a manometer. A few cuff-based wearables exist, but they still require the same reference-standard comparison as any other oscillometric device.
A practical approach for wearables:
- Take a seated, cuff-based reading with a validated upper-arm monitor.
- Immediately take a wearable reading on the same arm.
- Repeat across several days and note the average difference.
- Treat the wearable as a trend device, useful for spotting changes over weeks, not for diagnosing a single high reading.
Conclusion
The hardest part of monitoring blood pressure isn't the reading, it's trusting it. A device that drifts quietly will keep giving you numbers, and those numbers will keep looking normal.
Frequently Asked Questions
How do I know if my digital blood pressure monitor is accurate?
Run a side-by-side check against a recently calibrated manual sphygmomanometer. Take three readings on the same arm, alternating devices, and compare the systolic and diastolic numbers. A consistent difference of more than 5 mmHg suggests the device needs recalibration or repair. Also check that the cuff size matches the arm circumference, since an undersized or oversized cuff can skew readings by 10 to 15 mmHg.
Can you calibrate a blood pressure monitor at home?
You can perform a basic accuracy check at home using a manual sphygmomanometer and a T-tube connector, but true calibration that adjusts the internal pressure sensor requires specialized equipment and is best handled by a biomedical technician. Home users should treat their check as a validation step, not a full recalibration. If readings drift beyond the acceptable error margin, send the device to the manufacturer or a certified calibration service.
How often should medical-grade blood pressure monitors be calibrated?
Most clinical guidelines recommend calibration every 12 months for monitors used in patient care, and every 6 months for high-volume settings such as emergency departments or urgent care centers. Home monitors can often go 2 years between professional checks if stored and handled carefully. Any device that has been dropped, exposed to extreme temperatures, or shows inconsistent readings should be recalibrated immediately, regardless of the schedule.
What are the signs that a blood pressure monitor is malfunctioning?
Watch for error codes that repeat after a fresh battery or power cycle, readings that vary by more than 10 mmHg between consecutive measurements, a cuff that fails to inflate fully, or numbers that stay identical across multiple tests. You may also notice the systolic and diastolic values look reversed, or the display flickers. Any of these signs means you should stop using the device for clinical decisions and arrange a calibration check or replacement.